
Introduction
If you use a Shark vacuum in a U.S. home, cleaning the filters can help keep suction strong and reduce dust blowing back into the room. Most Shark vacuums have washable foam and felt filters, while some models also use a post-motor or HEPA filter that must be handled differently.
The safest method is simple: unplug the vacuum, remove the filters, tap out loose dust, rinse washable filters with cool water, let them dry fully, and reinstall them in the correct order. Always check your model’s owner’s manual before washing a filter. Shark designs vary across Navigator, Rotator, Lift-Away, Vertex, Stratos, and cordless models.
What You Need Before Cleaning a Shark Vacuum Filter
Gather these items before you start:
- Cool or lukewarm water
- A clean sink or bowl
- A soft, clean towel
- A dry, well-ventilated place
- Your Shark vacuum’s model number
- The owner’s manual, if available
Do not use soap, bleach, vinegar, disinfectant, or other cleaners unless Shark specifically allows it for your model. Cleaning products can damage the filter material or leave residue that restricts airflow.
Unplug a corded vacuum before opening it. Remove the battery from a cordless Shark vacuum if the battery can be safely removed. The vacuum should never run while a filter is wet or missing.
Find the model number first
The model number is often printed:
- On the bottom of the vacuum
- Near the dust cup
- On the back of the motor housing
- On the battery or charging area
- On the original box or receipt
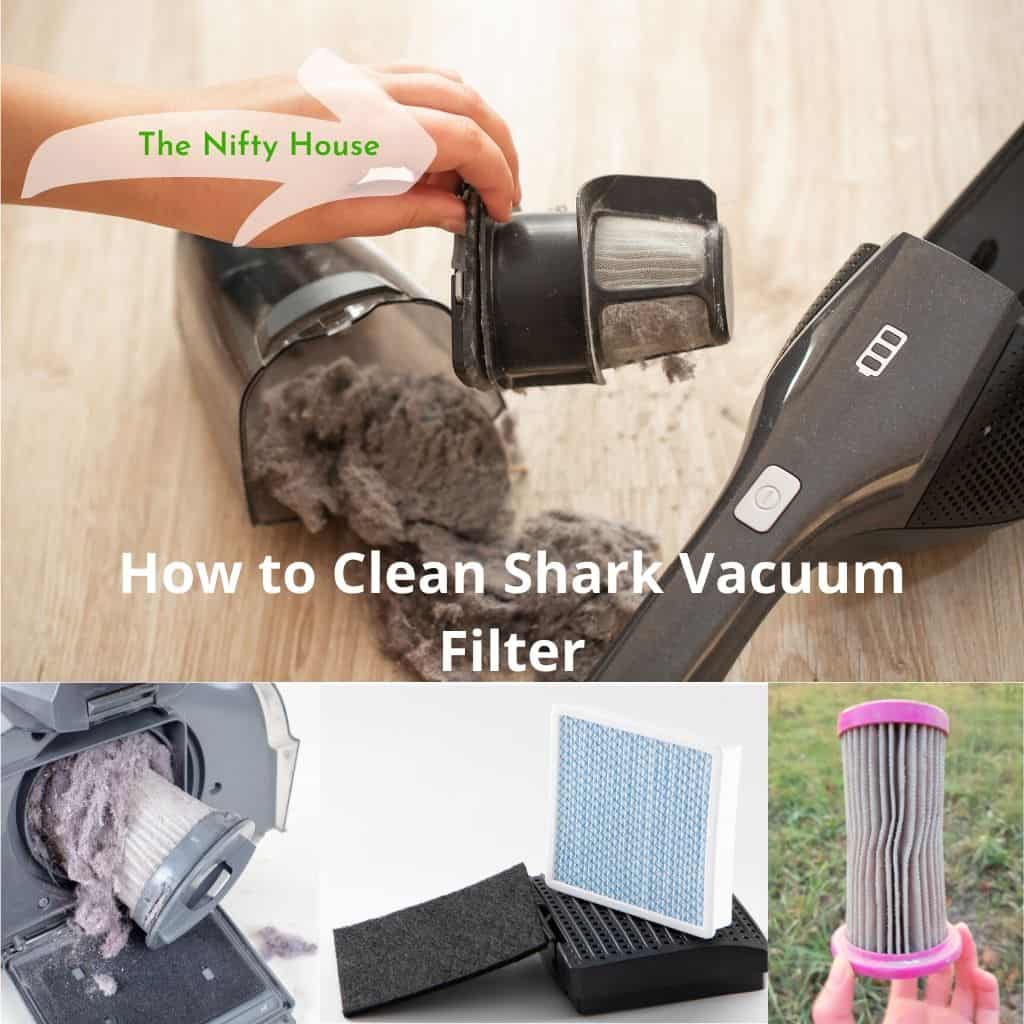
The exact filter layout depends on the model. A Shark Navigator may have foam and felt filters under the dust cup. A Shark Rotator or Vertex may also have a post-motor filter near the exhaust area. Some newer cordless models use a single washable filter or a filter cartridge with specific care instructions.
How to Clean a Shark Vacuum Filter
Follow these steps for most Shark upright, canister, stick, and cordless vacuums. If your owner’s manual gives different instructions, follow the manual.
1. Turn off and unplug the vacuum
Switch the vacuum off and disconnect it from power. For a cordless model, remove the battery when the design allows it.
Place the vacuum on a flat surface. This keeps small parts from rolling away and helps you see how each filter fits.
2. Remove the dust cup
Press the dust-cup release button and lift the cup away from the vacuum. Empty the debris into a trash can.
Hold the dust cup low over the trash can to reduce dust clouds. If the cup is very full, wearing a dust mask may help reduce exposure to fine dust.
3. Remove the pre-motor filters
Look inside or beneath the dust-cup area. Many Shark vacuums use two types of pre-motor filters:
- Foam filter: A soft, thick filter that traps larger dust particles.
- Felt filter: A thinner filter that provides another layer of filtration.
Some models use one foam filter instead of both foam and felt. Note the order and position before removing them. Taking a quick photo can make reassembly easier.
4. Shake or tap out loose dust
take the filters outside if possible. Gently tap them over a trash can or shake them carefully.
Do not hit the filters against a hard surface. Strong impacts can tear foam or bend the filter frame. Do not use a vacuum cleaner to clean the filter unless Shark’s instructions specifically allow it. High suction can damage soft filter material.
5. Rinse washable filters with cool water
Rinse each washable filter under cool or lukewarm running water. Rinse from different angles until the water runs clear.
Use your fingers to gently press the filter. Do not twist, wring, scrub, or pull it. Foam can stretch or tear when handled roughly.
If the filter is made of felt, use extra care. Felt can hold water for a long time and may lose its shape if squeezed too hard.
6. Clean the filter housing
While the filters are drying, wipe dust from the filter compartment with a dry cloth. You can also use a soft brush for loose debris.
Keep water away from the vacuum motor, electrical contacts, controls, and battery area. Never pour water into the vacuum body.
7. Dry the filters completely
Place the filters flat or upright in a clean, dry area with good airflow. Let them air-dry for at least 24 hours, or longer if they still feel damp.
Do not use:
- A clothes dryer
- A hair dryer
- A space heater
- Direct high heat
- An oven
- A microwave
- Compressed air held close to the filter
Heat can shrink foam, warp plastic, or damage the filter. Installing a damp filter can allow moisture to reach the motor. It may also cause a musty smell and poor suction.
8. Reinstall the filters in the correct order
Put each filter back exactly as it was removed. Make sure the filters sit flat and that the dust cup locks into place.
A filter that is upside down, folded, or not fully seated can create an air leak. The vacuum may then lose suction or make a high-pitched noise.
9. Test the vacuum
Reconnect the power or reinstall the battery. Run the vacuum for a short time without blocking the air path.
Check for:
- Normal suction
- No unusual whistling
- No burning or damp smell
- No filter warning light
- No dust leaking around the dust cup
If the vacuum still has weak suction, clean the brush roll, hose, dust cup, and air path as well. A dirty filter is only one possible cause.
How Often Should You Clean a Shark Vacuum Filter?
For many Shark models, the pre-motor filters need regular rinsing, often about once a month under normal use. Homes with pets, children, allergies, remodeling dust, or heavy daily cleaning may need more frequent care.
The correct schedule depends on the model and the amount of dirt it collects. Check the owner’s manual for the official cleaning and replacement interval.
Use these signs as practical reminders:
| Sign | What it may mean | What to do |
|---|---|---|
| Suction feels weaker | Filter, hose, brush roll, or dust cup may be blocked | Clean the filter and inspect the air path |
| Vacuum sounds louder | Airflow may be restricted | Check filters, hose, and brush roll |
| Dust returns to the room | Filter may be damaged, missing, or poorly seated | Reinstall or replace the filter |
| Filter smells musty | It may not be fully dry | Remove it and air-dry it longer |
| Filter looks gray or packed | Dust is blocking airflow | Rinse it if washable |
| Filter is torn or misshapen | It cannot filter correctly | Replace it with the correct model filter |
A filter can look clean and still restrict airflow. Fine dust may fill the spaces between the fibers. If suction remains poor after cleaning, replacement may be needed.
How to Clean a Shark HEPA or Post-Motor Filter
Do not assume every Shark HEPA filter is washable. Some Shark models use a washable post-motor filter, while others require a replacement filter or have special cleaning instructions.
First, check the model manual. Look for terms such as:
- Post-motor filter
- Exhaust filter
- HEPA filter
- Washable filter
- Filter replacement
If the manual says the filter is washable, rinse it with cool water and let it dry fully before reinstalling it. If the manual says not to wash it, remove loose dust only as directed and replace it when required.
A HEPA label does not automatically mean the filter can be washed. Water can damage some filter media or adhesives. Replacing the wrong filter with a generic part may also affect fit and airflow.
For allergy-sensitive households, avoid shaking a dirty exhaust filter indoors. Place it in a sealed bag before disposal if the filter is designed to be replaced.

What to Do If Your Shark Vacuum Still Has Low Suction
If washing the Shark vacuum filter does not restore suction, check the vacuum in this order.
Check the dust cup
A full dust cup can reduce airflow. Empty it before the debris reaches the maximum-fill line. Remove compacted dirt from the screen inside the cup if your model has one.
Check the hose and wand
Turn the vacuum off and disconnect the hose or wand. Look through the opening for hair, paper, or clumps of dust.
Never push a sharp object deep into the hose. A flexible cleaning tool or a straightened plastic hanger used carefully may help, but do not puncture the hose.
Check the brush roll
Hair and thread can wrap around the brush roll. Follow the model manual before opening the brush-roll cover.
Keep fingers away from the brush roll while the vacuum is connected to power. Remove tangled hair with scissors only when the vacuum is fully off and unplugged.
Look for a blockage warning
Some Shark vacuums use lights or displays to show an airflow problem. A warning may remain until the blockage is removed and the filter is dry and correctly installed.
Inspect the filter for damage
Replace a filter if it is:
- Torn
- Crushed
- Permanently misshapen
- Separating at the edge
- Unable to sit flat
- Still clogged after proper cleaning
Use a filter made for the exact model or a replacement confirmed to fit that model. Similar-looking Shark filters are not always interchangeable.
Common Mistakes When Cleaning Shark Vacuum Filters
Avoid these mistakes because they can damage the filter or vacuum.
Reinstalling the filter while it is damp
This is the most serious common error. A damp filter can allow moisture into the motor and create odors. Wait until the filter is completely dry inside and out.
Using soap or household cleaners
Soap may leave a film that blocks airflow. Strong cleaners can break down foam, felt, glue, or filter coatings.
Wringing or twisting the filter
Squeezing hard may change the shape of the filter. A misshapen filter can leave gaps around the housing.
Washing a filter that is not washable
Some post-motor or HEPA filters are not designed for water. Check the manual before rinsing them.
Cleaning only the filter
A blocked hose, brush roll, or dust-cup screen can cause the same symptoms as a dirty filter. Inspect the complete air path when suction remains weak.
Buying a filter by appearance alone
A filter can look similar but have the wrong size, thickness, or seal. Match the model number rather than relying only on the vacuum’s brand name.

When Should You Replace a Shark Vacuum Filter?
Replace a Shark vacuum filter when cleaning no longer restores airflow or when the filter is damaged. A washable filter is not meant to last forever.
Replacement is usually more appropriate when:
- The filter remains gray or clogged after repeated rinsing
- The foam has become thin or crumbly
- The felt is torn or stretched
- The filter has a lasting odor after complete drying
- Dust passes around the filter
- The vacuum repeatedly shows an airflow warning
- Suction is weak despite a clear hose and clean brush roll
The replacement interval depends on the model, household conditions, and filter type. Shark’s official support pages and owner’s manuals are the best places to confirm the correct part and care instructions.
Frequently Asked Questions
Can I wash a Shark vacuum filter?
You can wash a filter only if the instructions for your Shark model identify it as washable. Many foam and felt pre-motor filters can be rinsed with cool water, but some post-motor or HEPA filters require different care.
How long should a Shark filter dry?
Allow a washed Shark filter to air-dry for at least 24 hours. It may need longer in a cool or humid room. Do not reinstall it until the filter is fully dry.
Can I use dish soap to clean a Shark filter?
Usually, no. Plain cool or lukewarm water is the safer choice unless Shark specifically approves soap for your model. Soap residue can restrict airflow and may damage filter material.
Why does my Shark vacuum smell after cleaning the filter?
The filter may still be damp, or dirt may remain in the dust cup, hose, brush roll, or filter housing. Remove the filter, let it dry longer, and clean the rest of the air path. Replace the filter if the smell remains after proper cleaning.
Can I vacuum without the filter?
No. Do not operate a Shark vacuum without its required filters. The filters protect the motor and help keep dust from returning to the room.
How do I know which Shark filter to buy?
Find the vacuum’s model number and use Shark’s official support or parts pages to confirm compatibility. Do not choose a replacement based only on shape or product photos.
Key Takeaways
- Turn off and unplug the Shark vacuum before removing its filters.
- Many pre-motor foam and felt filters can be rinsed with cool water.
- Do not wash a HEPA or post-motor filter unless the model instructions allow it.
- Let every washed filter air-dry for at least 24 hours.
- Check the hose, brush roll, dust cup, and air path if suction remains weak.
- Replace filters that are torn, misshapen, damaged, or still blocked after cleaning.
- Use the owner’s manual for the exact filter layout and cleaning schedule.
Conclusion
Cleaning a Shark vacuum filter is a small task that can protect airflow and help the vacuum work as designed. Remove loose dust, rinse only washable filters, avoid harsh cleaners, and give the filters enough time to dry.
The best next step is to find your Shark model number and confirm which filters are washable. Once you know that, set a monthly inspection reminder and clean the filter sooner if you vacuum pet hair, fine dust, or large amounts of debris.


2 Comments