
To vacuum an automotive air conditioning system in the United States, connect a recovery machine or manifold gauge set and vacuum pump to the correct service ports. Remove air and moisture until the system reaches the vehicle maker’s vacuum target, commonly about 500 microns, then close the valves and run a decay test before charging it with the correct refrigerant by weight.
Vacuuming is needed after an AC repair, when a line has been opened, or when the system has lost its charge. It is not a way to remove refrigerant. In the U.S., federal rules prohibit knowingly releasing most automotive refrigerants into the air. Recover the refrigerant first with approved equipment.
This guide focuses on automotive AC systems, such as those in cars, SUVs, and light trucks. Home and commercial HVAC systems use similar vacuum principles but require different equipment, refrigerants, and licensing rules.

What Vacuuming an AC System Does
Vacuuming removes air, nitrogen, and water vapor from the closed AC system. A vacuum pump lowers the pressure so moisture can boil off and leave through the pump.
This matters because air and moisture can cause:
- Poor cooling
- High operating pressure
- Ice at the expansion valve or orifice tube
- Corrosion inside lines and components
- Damage to the compressor
- Chemical reactions with refrigerant oil
A vacuum does not repair a leak. It only prepares the system for a proper refrigerant charge. If the system will not hold vacuum, find and repair the leak before adding refrigerant.
Vacuum versus refrigerant recovery
These are different jobs:
- Recovery removes refrigerant and stores it in an approved recovery cylinder.
- Evacuation removes air and moisture with a vacuum pump.
- Charging adds the specified refrigerant and oil, usually by measured weight.
Never use a vacuum pump to recover refrigerant. A vacuum pump is not designed to safely store or separate refrigerant.

Tools and Supplies You Need
Gather the correct tools before opening the AC system. The exact fittings depend on the refrigerant and vehicle.
| Tool | Purpose |
|---|---|
| Recovery machine and approved cylinder | Removes existing refrigerant legally and safely |
| Manifold gauge set or AC service machine | Connects to the system and controls flow |
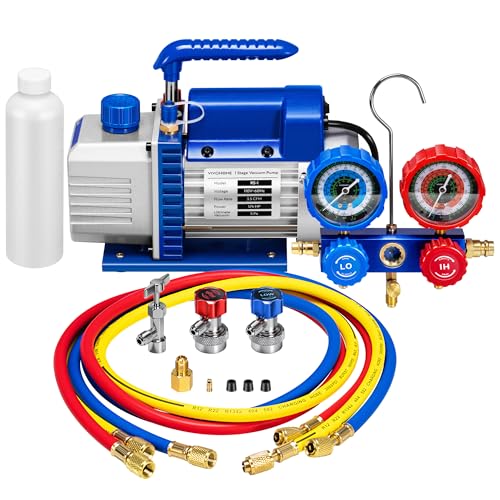
| Vacuum pump | Removes air and moisture |
| Micron gauge | Measures deep vacuum accurately |
| Correct service hoses and adapters | Connects the tools to the vehicle |
| Leak detector or approved leak-test solution | Helps locate leaks |
| Refrigerant scale | Measures the charge by weight |
| Correct refrigerant | Recharges the system after testing |
| Safety glasses and gloves | Protects eyes and skin |
| Service information | Provides charge amount, oil type, and vacuum requirements |
A manifold gauge set shows pressure, but its low-pressure gauge is not precise enough to confirm a deep vacuum. Use a digital micron gauge when possible.
For modern vehicles, check whether the system uses:
- R-134a
- R-1234yf
- Another refrigerant listed on the under-hood label
Do not mix refrigerants. Use fittings and equipment rated for the refrigerant in the vehicle.

Prepare the Vehicle Before Evacuation
Preparation prevents damage and makes the vacuum test useful.
- Park the vehicle on a level surface in a well-ventilated area.
- Turn the engine off and let hot parts cool.
- Read the under-hood AC label and service manual.
- Confirm the refrigerant type and factory charge.
- Inspect the compressor, hoses, condenser, evaporator connections, and service ports.
- Replace damaged O-rings before evacuation.
- Install new components correctly if the system was repaired.
- Add the specified compressor oil if a component was replaced and the service manual calls for it.
- Recover any remaining refrigerant with approved equipment.
Keep the system closed until you are ready to connect the gauges. A long-open system may have absorbed moisture, especially in humid weather.
Do not rely on a quick pressure reading to decide that the system is empty. Pressure may change with temperature, and liquid refrigerant can remain in the system.

How to Vacuum an Automotive AC System
The following steps apply to a typical vehicle with standard high- and low-side service ports. Always follow the vehicle and equipment instructions if they differ.
1. Connect the gauge set
With the engine off:
- Connect the blue hose to the low-side service port.
- Connect the red hose to the high-side service port.
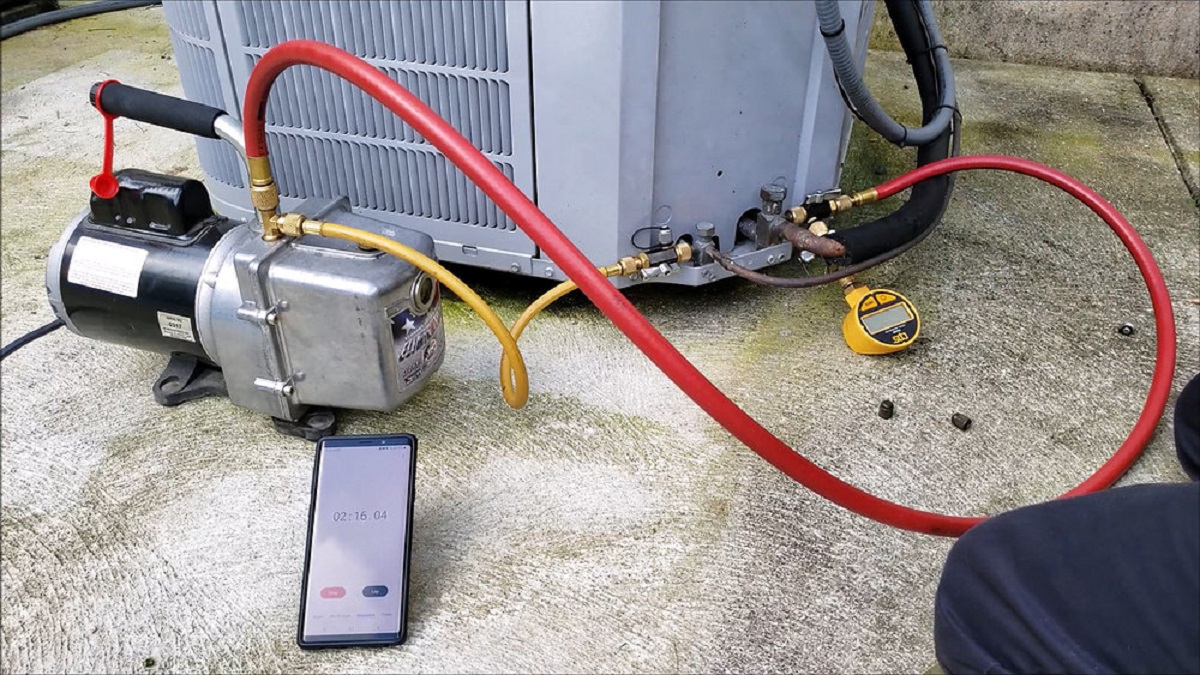
- Connect the center hose to the vacuum pump.
- Make sure the hose couplers lock fully.
- Keep the manifold valves closed at first.
The low-side port is usually larger than the high-side port, but do not identify ports by size alone. Use the labels and service information.
If the system uses R-1234yf, use equipment approved for R-1234yf. Do not force an R-134a coupler onto a different fitting.
2. Add a micron gauge
Place the micron gauge as close to the vehicle system as practical. The best location is often on a service port or a tee near the system, not at the far end of a long hose.
A gauge attached only to the pump may show a good vacuum while restrictions in the hoses or manifold hide a problem in the vehicle.
3. Open the manifold valves
Start the vacuum pump. Then open the low- and high-side manifold valves, if the equipment instructions allow evacuation through both sides.
Evacuating through both service ports can reduce restrictions and help remove moisture from the complete system. Use hoses with large internal passages when available.
Watch the micron reading as the vacuum improves. The number should fall over time. A system with heavy moisture may take longer to stabilize.
4. Pull the specified vacuum
Many automotive technicians use 500 microns or lower as a common evacuation target, but the vehicle maker or equipment maker may specify a different value.
Run the pump long enough to reach the target. Time alone is not proof of a good evacuation. A small system may need less time, while a wet system, long hose set, or large system may need much longer.
Do not start the vehicle engine during evacuation. The engine must remain off.
5. Isolate the system
When the system reaches the target:
- Close the manifold valves.
- Turn off the vacuum pump.
- Isolate the micron gauge from the pump if needed.
- Watch the vacuum reading.
A stable reading suggests the system is dry and tight. A rising reading suggests a leak, remaining moisture, trapped refrigerant, or a measurement problem.
6. Perform a vacuum decay test
A decay test checks whether the system holds vacuum after the pump is isolated.
The exact acceptable rise depends on the vehicle maker, test time, system size, temperature, and equipment. A rapid rise is a clear warning. A slow rise can come from a very small leak, moisture, hose leakage, or outgassing from the hoses.
If the system fails the test, do not charge it. Release the vacuum only according to the equipment procedure, repair the problem, and repeat the evacuation.
7. Charge the system by weight
After the system passes the vacuum test:
- Use the exact refrigerant listed on the vehicle label.
- Use a scale.
- Charge the specified amount.
- Add only the correct oil type and amount.
- Follow the service manual for charging through the high or low side.
Do not charge by pressure alone. Pressure changes with ambient temperature, airflow, compressor speed, and refrigerant amount. An undercharged or overcharged system can both cool poorly and damage parts.

How to Tell Whether the Vacuum Test Worked
A successful evacuation has several signs:
- The system reaches the required vacuum.
- The micron reading falls steadily.
- The reading remains stable during the decay test.
- No leak is found at fittings or components.
- The system accepts the correct refrigerant charge.
- The AC produces the expected vent temperature under the specified test conditions.
Vacuum performance is not the same as cooling performance. A system can hold vacuum and still have a bad compressor, blocked condenser, failed expansion valve, electrical fault, or incorrect charge.
After charging, test the system according to the service information. Check compressor operation, condenser airflow, pressure, vent temperature, and clutch or control-valve function where applicable.
What to Do If the AC System Will Not Hold Vacuum
A vacuum that rises after the pump is isolated does not identify the exact fault. Use a step-by-step check.
If the reading rises quickly
Check for:
- Loose hose couplers
- Damaged service-port cores
- Missing caps or seals
- Open manifold valves
- Loose fittings
- Cracked hoses
- A large leak in an AC component
Close the vehicle service valves if the equipment permits. If the gauge still rises, the problem may be in the hoses, manifold, or gauge setup.
If the reading rises slowly
Possible causes include:
- A small refrigerant leak
- Moisture still in the system
- A long evacuation time needed
- Warm hoses releasing trapped vapor
- Poor micron-gauge placement
- Oil or contamination in the system
Repeat the evacuation with the correct procedure. If the result does not improve, perform a leak test.
Common leak-test methods
A trained technician may use:
- An electronic refrigerant leak detector
- UV dye approved for that refrigerant and oil
- An approved bubble solution
- Pressure testing with dry nitrogen and a regulator
Never use oxygen or compressed air to pressure-test an AC system. Oxygen can create a serious fire or explosion hazard when mixed with oil and other materials.
Common Mistakes to Avoid
Using only the manifold gauge
A low-side gauge can show that the system is under vacuum, but it cannot confirm a deep vacuum. A micron gauge gives a more useful measurement.
Leaving the pump connected during the hold test
If the pump remains connected, the pump may hide a leak. Isolate the vehicle and observe the reading with the pump off.
Charging a system that fails the decay test
Refrigerant will not fix a leak. Charging a leaking system wastes refrigerant and can lead to poor cooling or compressor damage.
Opening the system without replacing seals
Many AC connections use replaceable O-rings. Reusing a flattened or damaged O-ring can create a leak soon after the repair.
Ignoring the correct oil
Different refrigerants and electric compressors may require specific oils. High-voltage hybrid and electric vehicles often require nonconductive compressor oil. Use the manufacturer’s specification.
Evacuating through restricted hoses
Small hoses, clogged couplers, or faulty valves can make the pump appear to work while the vehicle sees little vacuum.
Using the wrong refrigerant
R-134a and R-1234yf systems are not interchangeable. The refrigerant label and service equipment must match.
Venting refrigerant
Do not intentionally release refrigerant. The U.S. Environmental Protection Agency regulates refrigerant handling, and automotive technicians must use approved recovery equipment under the relevant rules.

Safety and Legal Limits in the United States
Refrigerant can cause frostbite if it contacts skin or eyes. Work in a ventilated area, wear eye protection and gloves, and keep ignition sources away from refrigerant and oil.
Do not open a pressurized AC system until the refrigerant has been recovered. Do not heat a refrigerant cylinder, puncture it, or leave it in a hot vehicle.
For motor-vehicle air conditioning, review the U.S. EPA’s Section 609 requirements. For stationary air-conditioning equipment, different requirements may apply under Section 608.
If you are unsure about refrigerant identification, recovery, high-voltage hybrid systems, or leak repair, use a qualified automotive AC technician. A hybrid compressor or an unfamiliar refrigerant is not a good place to learn by trial and error.

How Long Should You Vacuum an AC System?
There is no reliable single time for every vehicle. The correct stopping point is the required vacuum level plus a successful decay test.
A small, dry system may reach its target quickly. A system that was open for weeks, contains moisture, or uses long hoses may take much longer. If the reading stops improving, check for hose restrictions, pump oil condition, leaks, and moisture instead of simply running the pump longer.
Can You Vacuum an AC System Without a Micron Gauge?
You can connect a vacuum pump without a micron gauge, but you cannot confirm the quality of the evacuation with confidence. A manifold gauge may indicate vacuum, yet it does not measure the low pressure needed to verify moisture removal.
For a professional repair, a micron gauge is the better choice.
Do You Vacuum the High Side or Low Side?
Evacuate through both sides when the equipment and service procedure allow it. Opening both sides can reduce restrictions and help the pump act on the whole system.
Follow the manifold manufacturer’s instructions. Never open a valve or connect a hose in a way that creates a refrigerant release or unsafe pressure condition.
Can You Vacuum an AC System With the Compressor Running?
No. Keep the engine and compressor off during evacuation. The vacuum pump should remove air and moisture from the stationary system.
Run the engine only after the system has been properly charged and the service procedure calls for operational testing.
What Happens If You Do Not Vacuum the AC System?
Air and moisture may remain in the system. The result can be weak cooling, high pressure, corrosion, ice formation, and compressor damage.
A system that was never opened may not need evacuation. A system that lost refrigerant through a leak but remained sealed may need recovery, leak repair, and evacuation before recharge. The required procedure depends on what happened to the system.
Can a Vacuum Pump Find an AC Leak?
A vacuum test can show that the system does not hold vacuum, but it may not reveal the location of the leak. Some leaks behave differently under vacuum and pressure.
Use an approved leak-detection method after recovery and before charging. A nitrogen pressure test performed with the correct regulator is often more useful for locating a difficult leak.
Sources and Standards to Check
Use the exact service information for the vehicle because charge weight, oil type, vacuum target, and test method vary by model.
Useful U.S. references include:
- U.S. EPA: Motor Vehicle Air Conditioning
- U.S. EPA: Section 609 Technician Training and Certification
- U.S. EPA: Refrigerant Management Under Section 608
- The vehicle manufacturer’s repair manual and under-hood refrigerant label
- The vacuum pump, micron gauge, manifold, and recovery-machine manuals
These sources establish handling rules and equipment guidance. The vehicle manufacturer’s service information controls the specific refrigerant amount, oil specification, and repair procedure.
Final Takeaway
To vacuum an automotive AC system correctly, recover the old refrigerant, repair leaks, connect the proper equipment, evacuate with a vacuum pump, confirm the vacuum with a micron gauge, perform a decay test, and charge the system by weight.
The key test is not how long the pump runs. The key is whether the system reaches the required vacuum and holds it after the pump is isolated. If it does not, stop before charging and find the cause.

One Comment