
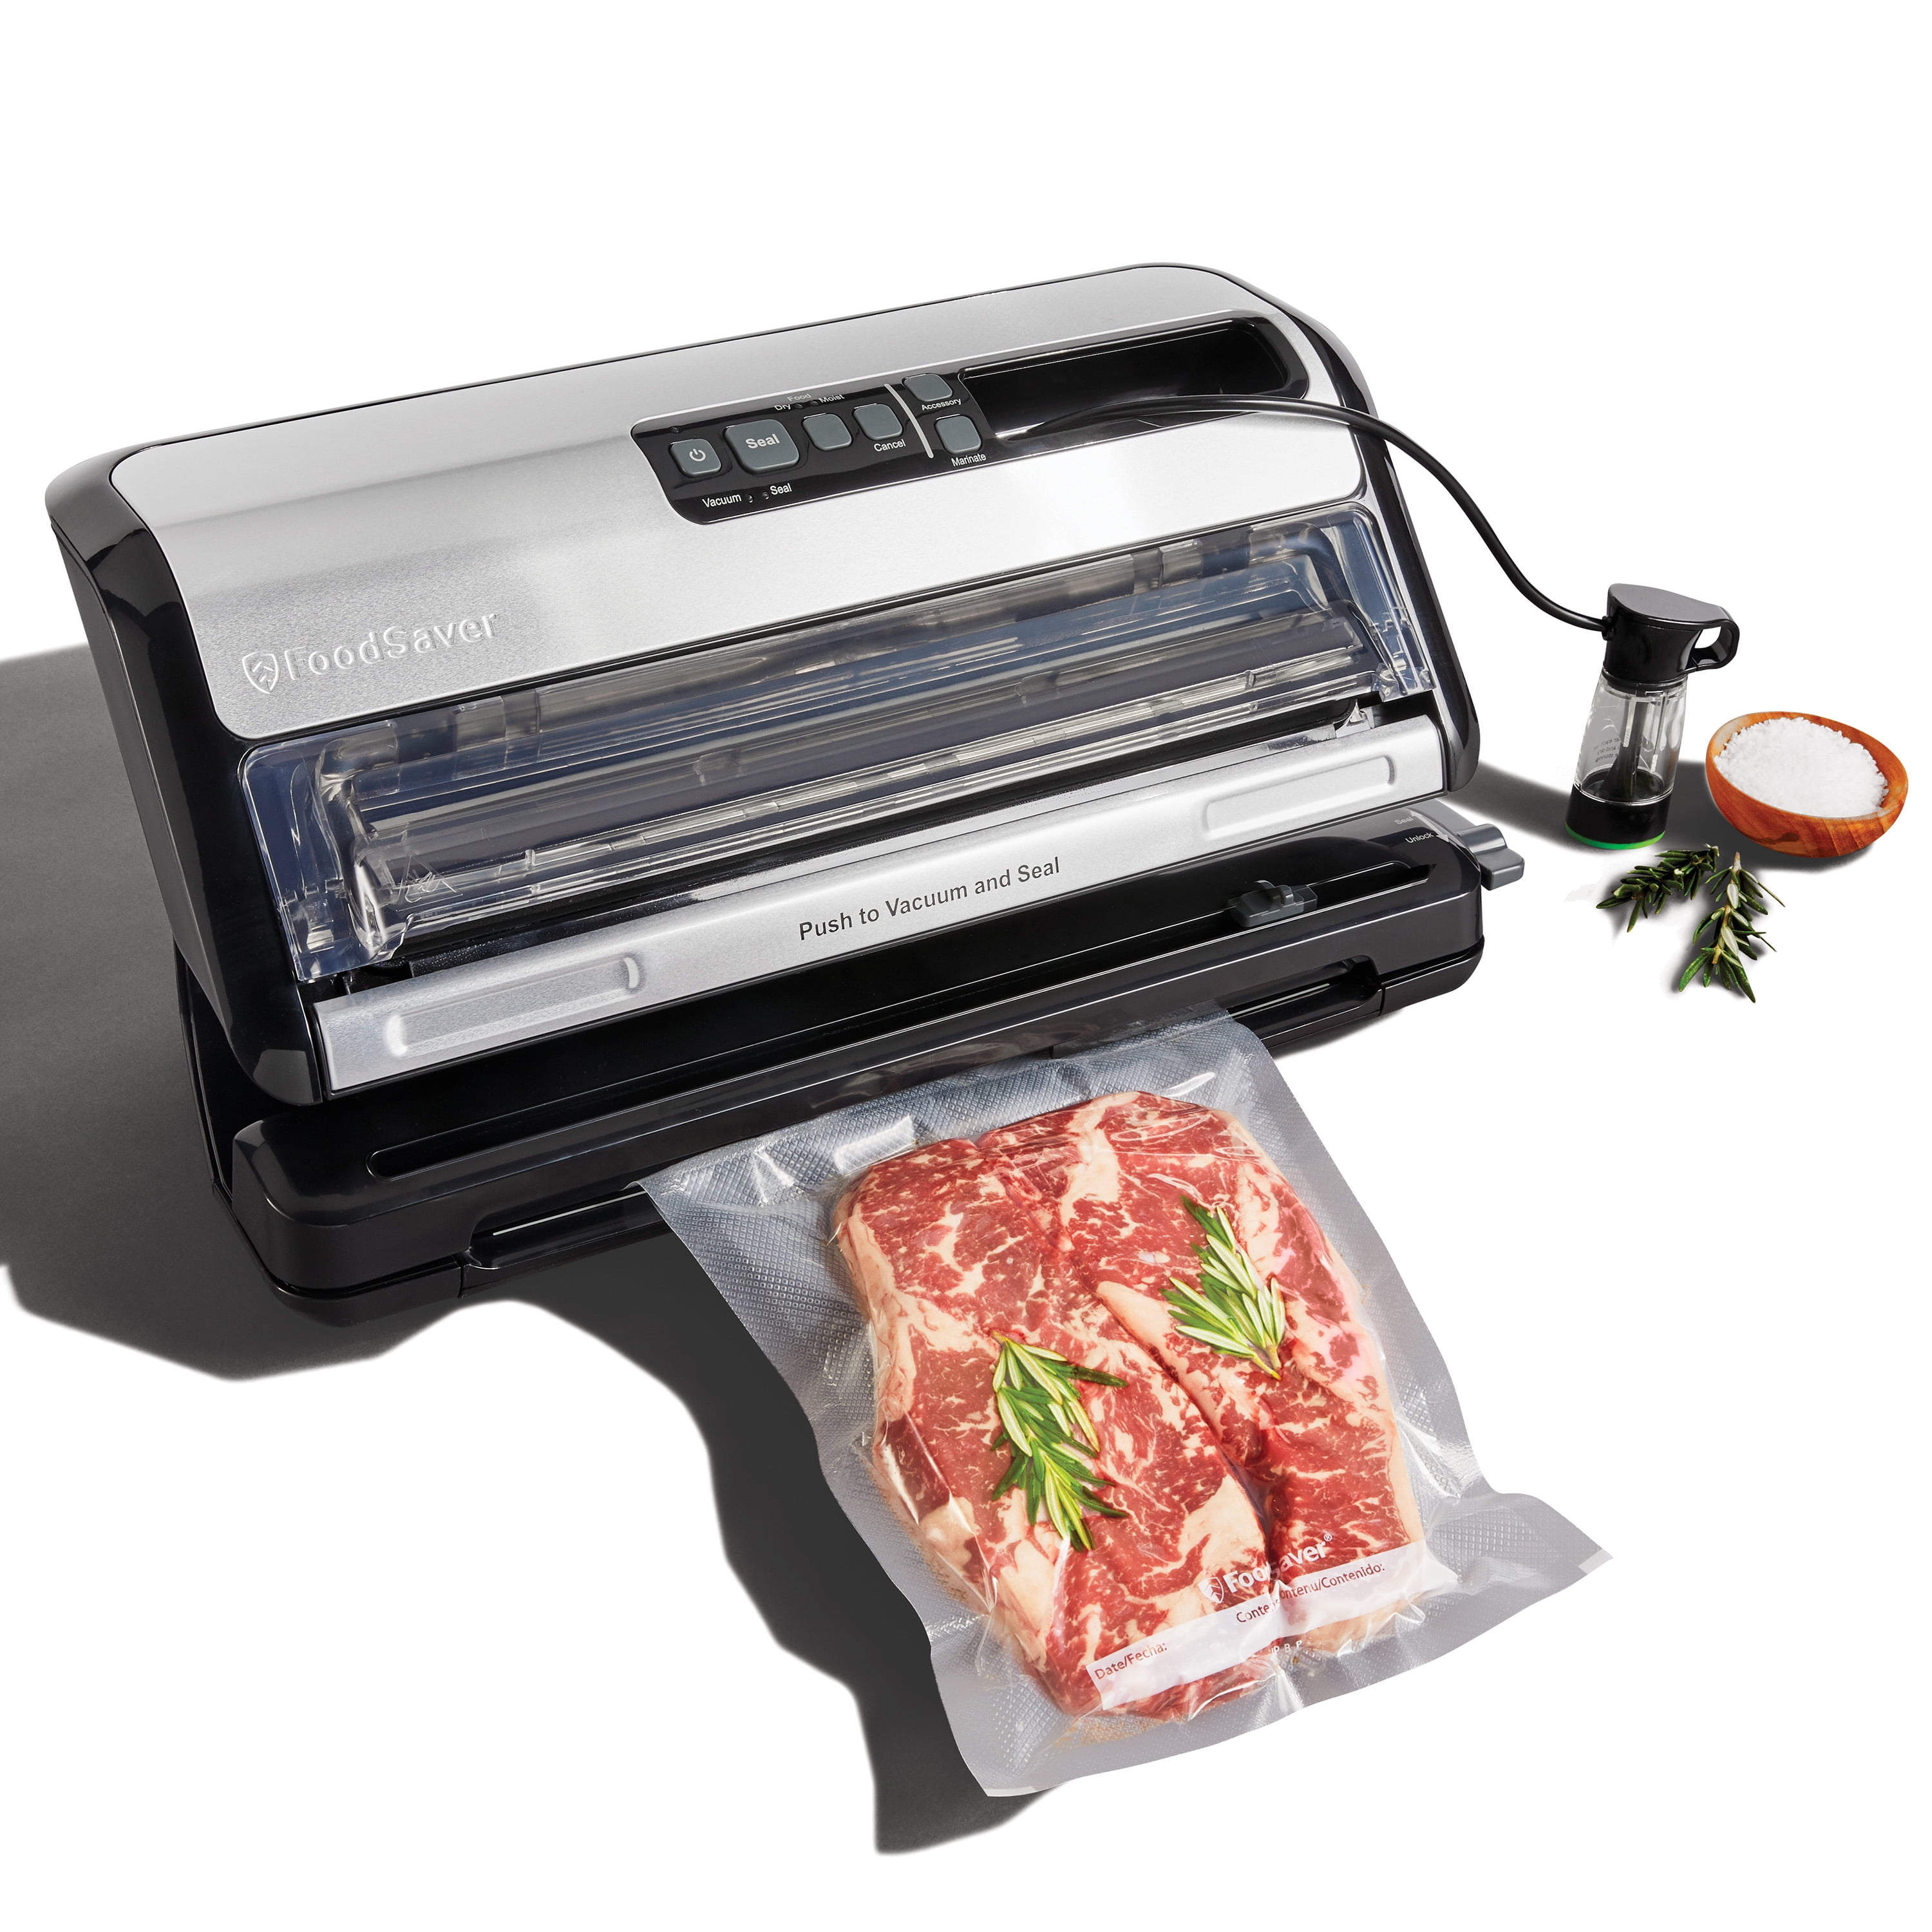
A FoodSaver vacuum sealer removes air from a special bag, then seals the bag shut. In the United States, you can use it to reduce freezer burn, keep dry foods fresh, portion meat, and store leftovers. It does not replace safe refrigeration, freezing, or proper cooking.
To use a FoodSaver, place food in a compatible bag, leave enough space at the top, position the open end in the vacuum channel, close and lock the lid, then press Vacuum & Seal. Check that the bag has a firm seal before storing the food.
What You Need Before You Start
You need four basic items:
- A FoodSaver vacuum sealing machine
- FoodSaver bags, rolls, or compatible textured vacuum bags
- Food to seal
- Clean, dry work space
FoodSaver models differ. Some have buttons such as Vacuum & Seal, Seal, Pulse, Moist, Marinate, or Canister. Your machine may not have all of these settings, so check the manual for your exact model.
Choose the Right Bag
Use bags made for external suction vacuum sealers. These bags usually have one textured or ridged side. The textured side helps the machine draw air from the bag.
Do not use a smooth plastic bag unless the package says it works with your FoodSaver. A regular storage bag may not let air pass through the machine correctly.
If you use a FoodSaver roll, cut a piece long enough to hold the food and leave about 3 inches of open space above the food. This extra space helps the machine create a strong seal.
Prepare the Food
Before sealing:
- Remove sharp bones or pointed edges that could pierce the bag.
- Wipe wet food so the outside of the bag is clean.
- Chill meat, fish, and cooked food before sealing.
- Let hot food cool before placing it in a plastic vacuum bag.
- Freeze liquid-rich food first if it may move toward the sealing area.
A clean, dry bag opening is one of the most important parts of the process. Moisture, crumbs, grease, or food particles can stop the seal from forming.
How to Use a FoodSaver Vacuum Sealer
Follow these steps for most FoodSaver external vacuum sealers.
1. Cut or choose the bag
If you are using a FoodSaver roll, cut a bag section that is large enough for the food. Leave space on the sides and at the top.
The food should not fill the bag tightly. Overfilling can block the air channel or prevent the bag from lying flat.
2. Seal one end of a roll
Skip this step if you are using a ready-made FoodSaver bag.
Place one open end of the roll across the sealing strip. Close and lock the lid, then press Seal. Wait until the machine finishes.
You now have a bag with one closed end and one open end.
3. Put the food into the bag
Place the food near the center of the bag. Keep the open end free of liquid, crumbs, oil, and food pieces.
For meat or fish, pat the surface dry with a clean paper towel. You can also place the food in the freezer for a short time first. slightly firm food is easier to seal than soft or watery food.
4. Place the open end in the vacuum channel
Open the FoodSaver lid. Put the open edge of the bag inside the vacuum channel. Keep the edge flat and straight.
Do not push the food into the channel. The machine needs a clear path to remove air.
5. Close and lock the lid
Close the lid firmly. On many models, you must turn a dial or press the sides until the lid locks.
If the lid does not lock, the machine may not start. Do not force it. Look for the lock position shown on the control panel or in the manual.
6. Press “Vacuum & Seal”
Press Vacuum & Seal. The machine will remove air from the bag and then seal it.
Watch the bag while the machine runs. The plastic should tighten around the food. The machine may stop automatically when it senses that the vacuum cycle is complete.
7. Check the seal
Open the lid only after the machine stops. Look for a straight, firm band of sealed plastic.
A good seal should be:
- Smooth and continuous
- Fully attached across the bag
- Free from wrinkles, gaps, and liquid
- Separate from the food by a small amount of clear plastic
If the seal looks weak, cut it off and seal the bag again above the first seal.

Which FoodSaver Button Should You Use?
Use the basic automatic setting for most dry, solid foods. Choose a different setting when the food contains liquid or needs gentler pressure.
| Food or task | Recommended setting | Why |
|---|---|---|
| Cheese, vegetables, meat, and dry snacks | Vacuum & Seal | Removes air and seals the bag |
| Food with some moisture | Moist or Moist Food | Helps reduce liquid entering the pump |
| Soft bread, berries, or delicate foods | Pulse or manual vacuum | Gives you more control |
| Sealing a bag without removing air | Seal | Closes the bag only |
| Food in a compatible container | Canister or accessory mode | Uses the accessory port |
| Quick flavoring with a compatible container | Marinate | Uses repeated vacuum cycles |
The names and controls vary by model. If your FoodSaver has no Moist setting, use short Pulse cycles or pre-freeze the food.
When to Use the “Seal” Button
Use Seal when you want to close a bag without removing air. This is useful for:
- Creating a bag from a roll
- Closing a bag after opening it
- Stopping the vacuum cycle before the food is crushed
- Sealing delicate food after using the Pulse function
When to Use Pulse or Manual Mode
Pulse mode removes air in short bursts. It works well for food that may crush or release liquid, such as:
- Bread
- Chips
- Crackers
- Soft fruit
- Pastries
- Mushrooms
- Fresh herbs
Press the vacuum control briefly, then stop when the bag fits closely around the food. Finish with Seal.
How to Vacuum Seal Moist or Liquid Foods
Liquid is one of the main causes of failed vacuum seals. The suction can pull broth, marinade, or meat juices toward the pump.
Use one of these methods:
Method 1: Chill the food first
Place the food in the refrigerator until it is cold. Cold food releases less vapor and is easier to seal.
For sauces or marinades, chill the liquid until it becomes thick but is still usable.
Method 2: Pre-freeze the liquid
Put the food in a freezer-safe container or on a tray. Freeze it until the liquid becomes solid or partly solid. Then transfer it to the vacuum bag and seal it.
This method works well for:
- Soup
- Stew
- Marinara sauce
- Meat with marinade
- Fruit in syrup
Leave extra space in the bag because frozen food may have sharp edges.
Method 3: Use a folded paper towel barrier
For food with a small amount of moisture, place a folded paper towel inside the bag above the food and below the seal line. The towel may catch small amounts of liquid before they reach the machine.
Keep the paper towel well below the final seal. Do not use this method for large amounts of liquid.
Method 4: Use the Moist setting
If your FoodSaver has a Moist setting, select it before starting the cycle. This setting may change the vacuum and sealing process, but it will not make large amounts of liquid safe to vacuum seal at room temperature.
After sealing wet food, clean the drip tray and vacuum channel if your model has removable parts.

How to Vacuum Seal Different Types of Food
Food shape and texture affect the best sealing method.
Meat and Fish
Pat meat or fish dry before sealing. Leave space between pieces if you want to remove them one at a time.
For foods with sharp bones, wrap the bone with freezer paper or place a protective layer between the bone and the bag. Avoid sealing food with exposed sharp edges.
Store vacuum-sealed raw meat and fish in the refrigerator or freezer. Vacuum sealing does not make raw food shelf-stable.
Vegetables
Many vegetables should be blanched before freezing. Blanching briefly heats the vegetables, then stops the cooking in ice water. This helps slow changes in color, texture, and flavor during frozen storage.
Vegetables commonly blanched before freezing include:
- Green beans
- Broccoli
- Carrots
- Peas
- Corn
- Spinach
Do not vacuum seal warm vegetables. Cool them first, then seal and refrigerate or freeze them.
Fruit
Soft fruit can crush under strong suction. Freeze berries, sliced fruit, or other delicate pieces on a tray first. Once firm, transfer them to a bag and use a gentle or Pulse setting.
Fruit with a lot of juice should be chilled or partially frozen before sealing.
Bread and Baked Goods
Use Pulse mode for bread, rolls, cookies, and pastries. Strong suction can flatten them.
You can also freeze soft baked goods before sealing. Place a piece of parchment or freezer paper between items if you want to remove them separately.
Dry Pantry Foods
A FoodSaver can help protect dry foods from air and moisture. Examples include:
- Rice
- Pasta
- Flour
- Coffee
- Dried beans
- Nuts
- Crackers
- Cereal
Make sure these foods are completely dry. Do not vacuum seal food that shows moisture, mold, insects, or spoilage.
How to Use FoodSaver Canisters and Containers
FoodSaver canisters use a hose or accessory port to remove air from a rigid container. They are useful for foods that could be crushed in a bag.
Typical steps are:
- Put the food in a compatible canister.
- Leave space between the food and the lid.
- Close the canister securely.
- Attach the FoodSaver hose to the accessory port and canister valve.
- Press Canister or the accessory button.
- Stop when the machine finishes or the container reaches a vacuum.
- Remove the hose before opening the lid.
Use only containers and accessories approved for your FoodSaver model. A vacuum canister is not the same as a pressure canner or a shelf-stable food canning system.
Do not use vacuum sealing to store low-acid foods at room temperature. Removing oxygen can create conditions in which some harmful bacteria may grow if food is not kept cold or frozen.

How Long Should Vacuum-Sealed Food Last?
Vacuum sealing can extend quality by reducing air exposure, but it does not give food an unlimited shelf life.
Use these basic storage rules:
- Keep refrigerated food at 40°F or below.
- Keep frozen food at 0°F or below.
- Refrigerate perishable food within 2 hours.
- Refrigerate it within 1 hour if the temperature is above 90°F.
- Do not rely on smell or appearance alone to judge safety.
Vacuum-sealed food still needs a safe storage location. Raw meat, fish, eggs, dairy, cooked leftovers, and cut produce belong in the refrigerator or freezer when required.
For food-storage limits, use current guidance from the USDA Food Safety and Inspection Service rather than treating vacuum sealing as a preservation method by itself. See the USDA food safety guidance and FoodKeeper storage recommendations.
How to Store Vacuum-Sealed Bags
Label every bag with the food name and date. Add cooking instructions if the package will go into the freezer.
Store sealed bags:
- Flat in the freezer for faster freezing and easier stacking
- In the coldest safe area of the refrigerator
- Away from sharp objects
- In a place where the seal will not be bent or rubbed
- With older packages placed where you will use them first
Do not place a sealed bag directly on a hot grill, in a conventional oven, or against a heating element unless the bag packaging specifically allows that use. Some FoodSaver bags may be designed for sous vide or simmering, but temperature and time limits depend on the exact bag.
What to Do When a FoodSaver Will Not Seal
Check the simple causes first. Most failed seals come from a wet bag opening, poor bag placement, a wrinkle, or too much food.
The machine removes air but does not seal
Possible causes include:
- The bag is too full.
- The open edge is not inside the vacuum channel.
- The bag opening is wet or dirty.
- The lid is not locked.
- The bag has a wrinkle across the sealing strip.
- The sealing area is hot from repeated use.
Fix it by cutting off the old seal, wiping the opening dry, leaving more space, and placing the edge flat in the channel. If the machine has been used several times in a row, let it cool according to the manual.
The bag loses its vacuum
Look for a hole, sharp food edge, weak seal, or food that continues to release liquid.
To test the bag, gently press it. If air returns quickly, move the food to a new bag. For sharp foods, cover the point with freezer paper or use a thicker protective layer.
A bag may also lose its vacuum if it is stretched or cut after sealing. Handle frozen bags carefully.
Liquid reaches the pump
Stop the cycle if liquid moves toward the vacuum channel. Press Seal if your model allows it, or let the cycle finish and then inspect the drip tray.
Clean the removable tray and other user-serviceable parts as directed by the manual. Do not pour water into the machine body.
For future bags, chill or pre-freeze the food and use the Moist or Pulse setting.
The machine makes noise but does not remove air
Check that:
- The bag is compatible with the machine.
- The lid is locked.
- The bag is not blocking the suction channel.
- The gasket is seated correctly.
- The accessory hose port is capped when not in use.
- The sealing strip and channel are clean.
If the pump still does not create suction, unplug the machine and consult the model manual or the manufacturer’s support service. Do not open the appliance unless the instructions permit user repair.

Common FoodSaver Mistakes to Avoid
Avoid these errors for better seals and safer storage:
-
Using a normal storage bag
Use a bag designed for external vacuum sealing. -
Leaving too little space
Leave about 3 inches of open bag above the food unless your manual gives another measurement. -
Sealing wet food without preparation
Chill, pre-freeze, or use the proper moisture setting. -
Putting crumbs or grease in the seal area
Wipe the bag opening before starting. -
Crushing delicate food
Use Pulse mode or freeze the food first. -
Vacuum sealing hot food
Cool food before placing it in a plastic bag. -
Treating vacuum sealing as canning
A vacuum-sealed bag does not make food safe at room temperature. -
Ignoring a weak seal
Re-seal the bag before storing it. -
Overusing the machine without a cool-down break
Follow your model’s instructions between cycles. -
Skipping labels
Write the contents and date on every package.
Quick Reference: The Best Method for Each Food
| Food | Preparation | Setting |
|---|---|---|
| Steak or chicken | Pat dry; protect sharp bones | Vacuum & Seal |
| Fish | Chill and pat dry | Moist or Pulse |
| Soup | Freeze first | Vacuum & Seal |
| Berries | Freeze on a tray first | Pulse or gentle vacuum |
| Bread | Freeze or use short pulses | Pulse, then Seal |
| Rice or pasta | Use only when fully dry | Vacuum & Seal |
| Chips or crackers | Use gentle pulses | Pulse, then Seal |
| Marinated meat | Chill or partly freeze marinade | Moist or Marinate |
| Leftovers | Cool quickly and refrigerate | Vacuum & Seal |
| Flour or coffee | Keep fully dry | Vacuum & Seal |

Frequently Asked Questions
Can I vacuum seal food while it is still warm?
No. Let hot food cool before sealing it in a plastic bag. For perishable food, cool and refrigerate it promptly rather than leaving it at room temperature for a long period.
Can I vacuum seal liquids?
Yes, but liquid needs care. Chill or pre-freeze soup, sauce, broth, or marinade first. Large amounts of liquid can move into the vacuum channel and cause a poor seal or damage the machine.
Can I use Ziploc bags in a FoodSaver?
Usually, no. Standard zipper bags are not designed for the external suction process. Use FoodSaver bags or another compatible textured vacuum bag.
Why does my FoodSaver bag have air pockets?
Small pockets can result from food shape, trapped air between pieces, wrinkles, or an incomplete seal. If the bag is still firmly sealed and the food is stored safely, small pockets may not mean the seal has failed. If the bag inflates or the seal opens, transfer the food to a new bag.
Can I microwave food in a FoodSaver bag?
Only if the bag package specifically allows microwave use and gives instructions. Cut or open the bag before heating if required. Never microwave a sealed bag unless the packaging clearly says it is designed for that use.
Is vacuum-sealed food safe at room temperature?
No. Vacuum sealing removes air, but it does not make perishable food shelf-stable. Keep food refrigerated or frozen as appropriate.
Final Takeaway
To use a FoodSaver vacuum sealer, choose a compatible bag, keep the opening clean and dry, leave enough room for the seal, place the bag correctly, and press Vacuum & Seal. Use Pulse mode for fragile foods and chill or pre-freeze wet foods before sealing.
The best results come from treating vacuum sealing as a packaging step, not a replacement for safe food storage. Label each bag, store it at the right temperature, and re-seal any package with a weak or broken seal.
Sources and Further Reading
- USDA Food Safety and Inspection Service: Food Safety Basics
- FoodSafety.gov: Cold Food Storage Charts
- FoodSaver Product Support
- The user manual supplied with your specific FoodSaver model
One Comment