
A vacuum leak lets unmetered air enter your engine. On many gas-powered cars and trucks sold in the United States, this can cause a rough idle, high idle speed, hard starting, poor fuel economy, or a check engine light.
The best way to check for a vacuum leak is to start with a visual inspection, then use scan-tool data or a smoke test to confirm the fault. A smoke machine is usually the most reliable method because it shows exactly where air escapes.

What Is an Engine Vacuum Leak?
An engine vacuum leak is an unwanted opening in the air-intake system after the mass airflow sensor or throttle body. Air enters through that opening without being measured by the engine computer.
The engine control module then receives more air than expected. On most modern gasoline engines, the computer adds fuel to correct the mixture. This creates a lean air-fuel condition, which means the engine has too much air or too little fuel.
Common leak points include:
- Cracked vacuum hoses
- Loose hose connections
- Damaged intake manifold gaskets
- Failed throttle-body gaskets
- Split PCV hoses
- Leaking brake-booster hoses
- Faulty EVAP purge valves
- Cracked intake boots
- Broken vacuum caps
- Leaking vacuum reservoirs
A vacuum leak is different from a fuel leak, coolant leak, or tire leak. It may not leave a visible liquid or smell. The engine may only run poorly at idle.
Vacuum leaks and unmetered air
“Unmetered air” means air that enters the engine without passing through the sensor used to measure incoming air. On vehicles with a mass airflow sensor, this is often air that enters after the sensor.
Some engines use a speed-density system instead. These systems estimate air flow from manifold pressure, engine speed, and other inputs. A vacuum leak can still cause problems, but the symptoms and scan data may differ.
Vacuum leak symptoms
A vacuum leak may cause:
- Rough or shaky idle
- An engine that stalls at stoplights
- High or fluctuating idle speed
- Hard starting
- Hissing near the engine
- Hesitation during acceleration
- Misfire codes
- Lean codes such as P0171 or P0174
- Poor fuel economy
- A check engine light
These signs do not prove a vacuum leak. A weak fuel pump, dirty injector, bad sensor, exhaust leak, or ignition fault can create similar symptoms.

What You Need Before Testing
Gather the right tools before you begin. A basic inspection needs very little equipment, but a confirmed diagnosis often needs a scan tool or smoke machine.
Basic tools
You may need:
- Flashlight
- Protective gloves
- Safety glasses
- Pliers
- Screwdrivers
- Replacement vacuum hose
- Small inspection mirror
- Vehicle repair manual
- OBD-II scan tool
A digital scan tool that shows short-term fuel trim and long-term fuel trim is especially useful. Many parts stores read trouble codes for free, but not all basic code readers display live fuel-trim data.
Prepare the vehicle safely
Follow these steps before testing:
- Park on a level surface.
- Set the parking brake.
- Place the transmission in Park or Neutral.
- Keep loose clothing, hair, and tools away from belts and fans.
- Work in a well-ventilated area.
- Let hot parts cool before touching them.
- Keep sparks and flames away from fuel vapors.
- Do not spray flammable chemicals onto a hot engine.
Never work under the hood while the engine is running if you are not comfortable around moving parts. Electric cooling fans can start without warning, even when the engine is off.

How to Check for a Vacuum Leak Step by Step
Use the following order. Start with low-risk checks before using special equipment.
1. Inspect every vacuum hose
With the engine off, look for hoses that are:
- Split
- Brittle
- Soft or collapsed
- Disconnected
- Pinched
- Rubbing against sharp parts
- Loose at the end
- Covered with oil that has softened the rubber
Bend each reachable hose gently. A small crack may open only when the hose moves.
Pay close attention to the ends of hoses. Heat often damages the hose near the intake manifold, throttle body, or a plastic fitting.
Replace damaged hose with the correct size and type. Do not use fuel hose as a replacement for every vacuum line. Check that the material is suitable for engine vacuum and heat.
2. Check the intake tube and air-box connections
Inspect the tube between the air-filter box and throttle body. Look for cracks on the underside, especially near clamps and bends.
A split intake tube can allow air to enter after the mass airflow sensor. This may cause lean readings, rough running, or acceleration problems.
Check that:
- The air-box lid is closed
- The filter is seated correctly
- All clamps are tight
- Small breather hoses are connected
- The intake tube has no hidden split
A leak before the mass airflow sensor may not act like a typical vacuum leak, but it can still disturb air measurement and engine operation.
3. Inspect the PCV system
The positive crankcase ventilation, or PCV, system routes crankcase vapors back into the engine.
Check the PCV valve, hose, grommet, and connecting fittings. A cracked PCV hose can act like a large vacuum leak.
If the PCV valve rattles when shaken, that does not prove it works correctly. Some valves can rattle yet leak too much air. Use the vehicle service information for the correct test.
4. Inspect the brake-booster hose
The brake booster often connects to the intake manifold through a large vacuum hose and a one-way check valve.
Look for:
- A cracked large hose
- A loose check valve
- A damaged rubber grommet
- A hissing sound near the brake pedal
- A change in engine speed when the brake pedal is pressed
Do not keep driving if the brake pedal feels hard or braking performance changes. A brake-booster problem can affect both engine operation and braking assistance.
5. Listen for a hiss
Start the engine and listen carefully. A steady hiss can point to a vacuum leak.
Use a length of clean hose as a listening tube. Place one end near your ear and move the other end around suspected areas. Keep the tube and your hands away from belts, pulleys, and fans.
A hiss may also come from:
- An intake manifold gasket
- A brake booster
- An EVAP purge valve
- An air duct
- An exhaust leak
Sound helps locate a problem, but it does not confirm the exact source.
6. Check engine speed changes
If you find a hose that seems loose, carefully press or move it while the engine idles. A clear change in engine speed can point to the leak.
Do not pull on hot parts or reach near moving components. Avoid touching ignition wires, coils, and other high-voltage parts.
7. Review trouble codes
Connect an OBD-II scan tool and record all codes before clearing anything.
Common codes related to a possible vacuum leak include:
- P0171: System too lean, Bank 1
- P0174: System too lean, Bank 2
- P0300: Random or multiple-cylinder misfire
- P0507: Idle speed higher than expected
- Manufacturer-specific idle or airflow codes
A code identifies a system problem. It does not always identify the failed part. For example, P0171 can result from a vacuum leak, low fuel pressure, a dirty mass airflow sensor, or an exhaust leak near an oxygen sensor.
8. Use fuel-trim data
Fuel trims show how much the engine computer is correcting the mixture.
- Short-term fuel trim, or STFT: A quick correction that changes often.
- Long-term fuel trim, or LTFT: A learned correction stored over time.
As a general diagnostic guide, fuel trims that are strongly positive may suggest a lean condition. The exact normal range varies by engine, operating temperature, load, and manufacturer.
Compare the readings at idle and at about 2,500 rpm with the vehicle in Park or Neutral.
A common pattern is:
| Fuel-trim pattern | Possible meaning |
|---|---|
| High positive trims at idle that improve at higher rpm | Possible intake or vacuum leak |
| High positive trims at idle and higher rpm | Possible fuel delivery or sensor problem |
| Normal trims at idle but worse under load | Possible fuel supply, ignition, or airflow problem |
| One bank much leaner than the other | Possible bank-specific leak, injector issue, or exhaust leak |
This pattern is a guide, not a final diagnosis. Follow the repair information for the specific vehicle.
9. Test with a smoke machine
A smoke test is usually the clearest way to find a vacuum leak.
A diagnostic smoke machine sends low-pressure smoke into the intake system. Smoke escaping from a hose, gasket, cap, or valve shows the leak location.
For a proper test:
- Turn the engine off.
- Seal the intake opening as directed by the equipment instructions.
- Connect the smoke machine to an approved test point.
- Block or isolate systems when required.
- Apply smoke at the pressure specified by the vehicle or equipment instructions.
- Inspect all intake, vacuum, PCV, and EVAP connections.
- Mark every leak before making repairs.
Do not use excessive pressure. High pressure can damage seals or force smoke into places it does not belong.
A smoke test may need to be performed in more than one configuration. For example, the intake system, crankcase ventilation system, and EVAP system may require separate procedures.

Which Vacuum Leak Test Works Best?
The best test depends on the symptom, the vehicle, and the tools available.
| Test | Best use | Main limit |
|---|---|---|
| Visual inspection | Loose or cracked hoses | Misses hidden leaks |
| Listening test | Large leaks | Sound can travel |
| Scan-tool fuel trims | Confirms a lean pattern | Does not locate the leak |
| Vacuum gauge | Shows engine vacuum behavior | Needs correct connection and interpretation |
| Smoke test | Locates many small leaks | Requires equipment and proper setup |
| Spray test | Sometimes finds a small external leak | Fire, damage, and false-result risk |
A smoke test is often the safest precise method when a visual inspection does not find the problem. Scan data can help decide whether a leak is likely before paying for a smoke test.
Using a vacuum gauge
A vacuum gauge connects to a suitable intake-manifold vacuum source. A healthy engine usually creates steady vacuum at warm idle, but the correct reading depends on altitude, engine design, valve timing, and test location.
Do not diagnose an engine from one gauge number alone. A low or unstable reading can also indicate:
- Late ignition timing
- Incorrect valve timing
- Worn valves
- A head-gasket problem
- An exhaust restriction
- An internal engine fault
The gauge pattern matters more than a single number. Use a repair manual for the engine when possible.
Why spray tests need caution
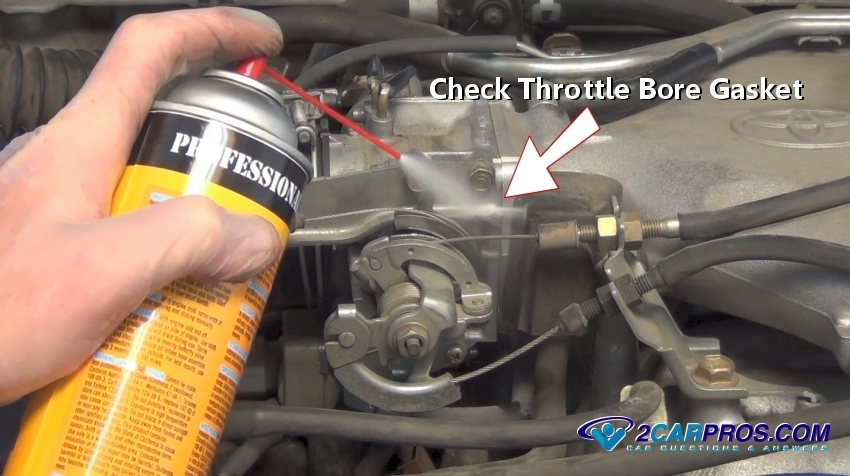
Some do-it-yourself guides suggest spraying carburetor cleaner, brake cleaner, or another flammable liquid around suspected leaks. If the liquid enters the leak, engine speed may change.
This method has serious limits. The spray may ignite on a hot exhaust part. It may damage paint, rubber, plastic, or electrical parts. It may also create false results.
A smoke machine is a better choice. If you use any chemical product, read its label and safety data sheet, keep it away from ignition sources, and follow the vehicle maker’s instructions.
How to Find a Vacuum Leak With Fuel-Trim Data
Fuel-trim data can help separate a likely vacuum leak from other causes.
Start with the engine fully warm. Check the readings at idle, then compare them with readings at a steady higher rpm. Avoid revving the engine near the redline.
Pattern 1: High trim at idle, lower trim at higher rpm
This pattern often points to a vacuum leak.
At idle, the engine takes in a small amount of air. A leak therefore makes up a larger share of the total air entering the engine. At higher rpm, the engine draws in much more air, so the same leak has less effect.
This is a useful clue, not proof.
Pattern 2: High trim at idle and at higher rpm
Look beyond vacuum hoses. Possible causes include:
- Low fuel pressure
- Restricted fuel filter
- Weak fuel pump
- Dirty injectors
- Incorrect mass airflow readings
- Unmetered air entering through the intake
- Exhaust leaks near oxygen sensors
Test fuel pressure and sensor operation according to the vehicle service manual.
Pattern 3: One bank is lean
On a V6 or V8 engine, a leak near one intake runner may affect one bank more than the other.
Other possible causes include:
- A leaking intake gasket on that bank
- A weak injector
- A bank-specific exhaust leak
- A damaged oxygen sensor
- A cylinder-specific misfire
Do not replace oxygen sensors based on a lean code alone.
Pattern 4: Fuel trims look normal
A vacuum leak may still exist if:
- The computer has adapted to it
- The leak occurs only under certain conditions
- The leak is in a system not represented by the current data
- The engine is not fully warm
- The scan tool data is inaccurate
- Another fault is masking the pattern
A smoke test can reveal a leak even when the live data is not dramatic.

Common Mistakes When Checking for Vacuum Leaks
Avoid these common errors:
Replacing parts based only on a code
A lean code does not automatically mean the oxygen sensor or mass airflow sensor is bad. Test the air, fuel, and exhaust systems before replacing parts.
Ignoring small hoses
A small vacuum hose can create a large idle problem. Inspect every branch, connector, cap, and check valve.
Forgetting the underside
Cracks often form underneath intake tubes and hoses. Use a mirror or remove the tube for a full inspection.
Confusing an exhaust leak with a vacuum leak
An exhaust leak before an oxygen sensor can allow outside air into the exhaust stream. The sensor may then report a lean condition even when the intake has no vacuum leak.
Look for:
- Exhaust ticking
- Soot marks
- A leak near the exhaust manifold
- A lean code without clear intake symptoms
Testing a cold engine only
Some leaks appear after the engine warms up. Rubber softens, plastic expands, and purge valves may change state with temperature.
Check the vehicle both cold and warm when the symptom is temperature-related.
Forgetting EVAP components
The EVAP purge valve connects fuel-vapor plumbing to the intake on many vehicles. If it sticks open, it can act like a vacuum leak.
An EVAP leak code does not always mean an intake vacuum leak. EVAP systems may require a separate test procedure.
Using too much smoke pressure
More pressure is not better. Excess pressure can cause damage and create new leaks. Use the pressure and connection points specified by the equipment and vehicle information.

Is It Safe to Drive With a Vacuum Leak?
A small vacuum leak may allow the vehicle to move, but driving it for a long time can cause additional problems.
A lean mixture can increase combustion temperature and may damage the catalytic converter if the engine misfires. A severe leak can cause stalling in traffic. A brake-booster leak can also affect brake-pedal feel.
Stop driving and seek professional help if:
- The engine stalls repeatedly
- The check engine light flashes
- The brake pedal becomes hard
- The engine misfires badly
- The vehicle loses power
- You smell fuel
- You see smoke or signs of fire
- The leak is near a hot exhaust part
A steady check engine light with mild symptoms still needs diagnosis soon. A flashing check engine light usually indicates a severe misfire that can damage the catalytic converter.

When Should You Take the Vehicle to a Mechanic?
A repair shop is the better choice when the leak is hidden, the vehicle has electronic throttle control, or the diagnosis involves the brake booster or EVAP system.
Professional help is also wise when:
- You cannot access the intake safely
- The engine has multiple lean and misfire codes
- A smoke test shows several leaks
- Fuel trims do not match the symptoms
- The intake manifold must be removed
- The vehicle has a warranty or emissions warranty concern
- The repair requires special scan-tool functions
Ask the shop for the test result, not only the replaced part. A useful repair order should state where the leak was found and how the shop confirmed the repair.
After repair, clear codes only if appropriate, then confirm that the engine reaches normal temperature and that fuel trims return to a reasonable pattern. Some monitors need a drive cycle before the vehicle is ready for an emissions inspection.

Frequently Asked Questions
Can I find a vacuum leak without a smoke machine?
Yes. Start with a visual inspection, listen for hissing, inspect the PCV and brake-booster hoses, and check fuel-trim data. A smoke machine is still more reliable for small or hidden leaks.
Will a vacuum leak always cause a check engine light?
No. A small leak may not set a code. A larger leak may set lean, misfire, or idle-control codes. The engine computer may also compensate for a leak until its correction limit is reached.
Can a bad PCV valve cause a vacuum leak?
Yes. A PCV valve that stays open, a cracked PCV hose, or a damaged PCV grommet can allow too much air into the intake.
Can a vacuum leak cause high idle?
Yes. Extra air can raise idle speed. Other causes include a dirty throttle body, an electronic throttle fault, an idle-control problem, or incorrect engine timing.
Does a vacuum leak affect fuel economy?
It can. The engine computer may add extra fuel to correct the lean mixture. Fuel economy may fall, but the actual effect depends on the leak size and the vehicle’s control system.
Can a vacuum leak cause a misfire?
Yes. A lean mixture can cause random or cylinder-specific misfires. A misfire can also come from spark, fuel, compression, or timing problems, so test before replacing parts.
Is an EVAP leak the same as a vacuum leak?
No. An EVAP leak is a leak in the fuel-vapor control system. Some EVAP faults can affect engine vacuum, but many EVAP leaks do not cause rough idle. Use the vehicle’s EVAP test procedure.
Final Takeaway
To check for a vacuum leak, inspect the hoses and intake first, listen for a hiss, review trouble codes and fuel trims, and use a smoke test to confirm the exact source. Do not treat a lean code as proof of one failed part.
Begin with the engine off and cool when possible. If the leak affects braking, causes severe misfires, or cannot be found safely, stop testing and have the vehicle diagnosed by a qualified technician.



One Comment